May 3rd 2022
Rotary Setup on 7813 Laser Controller
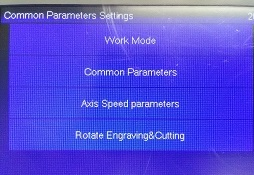
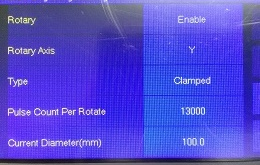
After connecting a rotary device to the machine, we need to adjust the scale in the controller setting. Different rotaries have different gear ratios and roller diameters, we have to do some trial and errors to get the correct scale. To get to rotary setting, press menu->common parameter:
Draw a rectangle with length equal to the circumference of the workpiece on the rotary. Download the job to the machine. For convenient, we can set the blue dot origin to the top right corner.

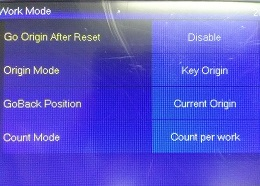
To use the touchscreen origin button to set the origin, we can select work mode->origin mode->key origin.
Make sure the Y position at the bottom left of touchscreen is not “out of range”: We need to jog the laser head to the correct position before pressing the origin button. For example, if the rectangle is 100mm long vertically, and origin is pressed when Y position is 300, the job travels from Y300 to Y400, which will be out of the 380mm default range of our desktop machine. Similarly, if the blue dot origin of the job is set to bottom instead of top, the job travels from Y300 to Y200. We can increase the max Y range temporarily for the rotary, as the rotary can have an infinite range. It is not necessary if the object's circumference is small.
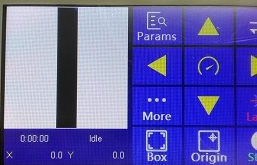
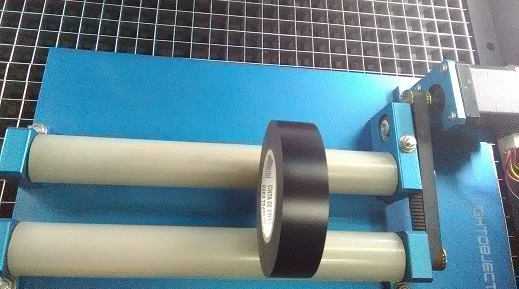
If the rotary scale is correct, the “box” button should make the object rotate 360degrees then return back to the original position. Input the diameter of the workpiece to the "Current Diameter". For traction rotary, we do not need to change the diameter value when we put different object on the rotary. For the 7813 controller, it is easier to use the “clamped” type setting and adjust the pulse number. If the "pulse count" number is too small, it may rotate less than 360degrees. If the number is doubled, it rotates twice as much.
If the speed of the rotary is too high, we may limit the maximum speed. For 7813 controller, the rotary share the same maximum speed of the Y axis. Do not forget to change back its value when we need to disable the rotary to use the Y axis again.
If you have a small machine that cannot fit the rotary along x axis, you may have to put the rotary along y axis. In that case, we need to set the rotary setting to X and connect the rotary motor to the x motor driver.
The above process for 7824 controller is almost the same. 7824 uses U axis for rotary.