Posted by J on Jun 24th 2021
Notes on laser engraving fine pictures
Glass CO2 laser tubes cannot fire as fast as RF laser. However, with proper adjustment, they can achieve good photo marking. It takes 2~4ms for the glass tube laser beam to stabilize, which is why a glass tube engraves "slope" at the beginning of a line. It does not have enough time to fire when the speed is too high. A small improvement can be achieved if the minimum laser output is higher than zero, so the laser tube never stops firing. The stabilizing time can be around 1ms from low power to high power. However, we need to make sure the low power does not mark on the material.
For image engraving, we usually use the low mA "pre-ionized"/unstable laser beam.
For material easily burned or having low vaporization temperature, even a little bit of power variation can affect the marking result. If you pair a high power power supply with a small laser tube, the power at the start of firing could be higher or lower than the rest of that firing's. It is better to match the power supply rating with the laser tube. Also we should keep the water temperature constant.
Grayscale engraving can be done on wood because the color gets darker with higher power. One problem with wood though is that the dot size is not small because of the grid structure of the wood. Anodized metal does not suit grayscale, but the dot size is small. Dithering is the way to go. The main parameters we can control are image dither dot size, dot distance and scan gap.
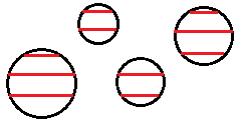
First, we need to make sure the laser dot size is smaller than the image dot size. Also, the scan gap needs to be small so there is no line left in between each step. The following is an exaggerated view. The dither dot distance and size depend on the dithering algorithm. The red lines are where the laser fires. Laser power is fixed; laser is either on or off on each pixel. The best result we can get is filling up the circles with red lines. Another way is to make the dithered dots small so that laser only burns once on each dot; scan gap needs to be the same as the dot spacing. The best physical result is close to the dithered image shown on computer screen.
There is a kind of marking on wood that creates fake 3D effect. The point is to adjust the marking color the same as the real shadow color. Making the dots closer or using higher power can make the marking look darker.